Bare root Fruit trees to Plant in February.
Now that the big freeze is over (knock on wood) and we are coming up on the end of meteorological winter, it’s time to get those bare root fruit trees in the ground! You may have seen the tempting displays popping up in local stores and nurseries. After this cold weekend, I know I’ve started dreaming of a flush of blossoms in the spring and fresh fruit jams in the summer and fall.
BARE ROOT FRUIT TREES
A bare root fruit tree is a tree has been dug up, had the soil removed from its root system, and stored while dormant with something to keep the roots moist until planted. Bare root trees are generally cheaper and have longer roots than potted trees. Sometimes nurseries go ahead and pot them into gallon pots just to keep the roots hydrated.

Healthy bare-root peach ready for planting.
When selecting a bare root fruit tree, you’ll want to confirm that the roots are moist and that the wood is alive and healthy. You can snip off a bit of root to make sure the insides are a healthy white. Watch out for knots or galls on the root—those can be sign of root knot nematodes.
Scratch Test Technique
Healthy wood will be flexible with visible (dormant) buds. Check the bark for injuries, gum, or other signs or stress or disease. If you’re unsure the wood is alive, you can make a small, shallow scratch in the trunk bark (above any graft line, if applicable) with your thumbnail or a smooth knife to check if the cambium layer is damp and greenish. If the tissue is brittle, brown, and dry, the tree has died.
HOW TO PLANT
Bare root fruit trees must be planted when dormant, so now’s the time. Planting them when dormant helps them start growing roots before they break dormancy, which will give them a leg up later when our Central Texas weather gets hotter and water gets scarcer.
Pick a spot that gets plenty of light, drains well, and is slightly elevated. Low spots, even with good drainage, tend to trap cold air. If you’re worried about the tree breaking dormancy too early (like what happened with many of my fruit trees before the big winter storm in 2021), you can try planting them on the north side of your property and out of the warm afternoon sun.
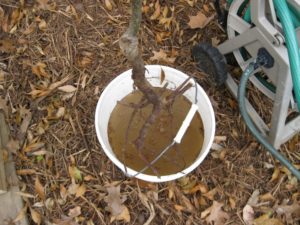
Hydrate roots while digging the planting hole.
Don’t Forget to Hydrate!
Before planting, remove any packing material from around the roots, like paper, moss, or weird gelatin goop. Use a bucket of water to place the tree in to help hydrate the roots while you prepare a planting hole. Dig a hole about the size of the root system or slightly bigger, usually about 12-18 inches across. Dig deep enough so the ground is level with the root collar, which is the part where the trunk meets the root ball. There will be a visible color change on the trunk to indicate where the soil level was when it was grown.
Place the tree in the hole and fill it with the original soil you dug out. This will help the growing root acclimate to the soil in your yard. If you mix in amendments, that can change the structure of your soil in the hole and contribute to root girdling (where roots wrap around each other and the trunk instead of spreading out) as new growth seeks the path of least resistance. Water the tree well to settle the soil and get of any large air pockets.
Now – Off With Its Head!
Then—and this is the most painful part—cut, cut, cut. Get rid of all the side branches and cut your trunk by at least a third (leave a 36 inches tall trunk.) This cut back will help the tree divert resources into root growth, which will mean faster and healthier top growth later. Place a grow tube or aluminum foil on the lower 18 inches of the trunk, leaving the upper 6 inches of the trunk exposed. This cover will help reduce sunscald, keep scaffold limb formation at an appropriate height on the trunk
And finally, remove all other plants in a 2-3 foot diameter around the tree. The bare soil will reduce competition for nutrients. Mulching this area can also help suppress weed growth and slow down water loss. Dormant trees don’t need a lot of water, so you can generally hold off on watering again until new growth starts to emerge.
VARIETIES FOR CENTRAL TEXAS
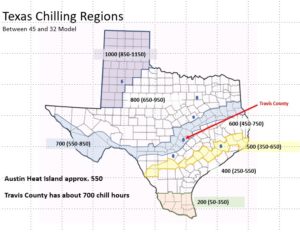
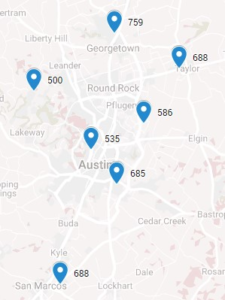
Austin chill hour range is 450 to 750 hours.
For fruits with chilling requirements, like apples, pears, plums, and peaches, one of our biggest growing challenges in Travis County can be insufficient chilling.
Between 45 and 32 Model used, date range 11/1/2020 through 2/20/2021
Varieties with a lower chilling requirement will have better production and fruit quality. However, you don’t want a chilling requirement that is too low, because those trees might break dormancy too early and take damage from late spring frosts.
Other fruit trees, like persimmons, jujubes, figs, pomegranates, citrus, pecans, olives, and loquats all have unique requirements and sensitivities depending on variety.
Click here for a list of fruit varieties known to do well in Travis County. For more information and tips and tricks for successful growing, check out the Fruit and Nut Fact Sheets compiled by Texas A&M AgriLife Extension.
Additional Resources
Fruit Varieties for Travis County
Aggie Horticulture Fruit and Nut Resources
Fruit and Nuts for Austin Overview
About Alina
 Alina Flasinska is a Travis County Master Gardener 2022 intern. Alina has studied Sustainable Agriculture at ACC through their Continuing Education program and has been a volunteer out at Greengate Farms. She says she likes to be a “lazy” gardener who uses natives and adapted plants that require minimal work to look great.


 Gayleen gardens in the hills of northwest Travis County. When she’s not digging in the dirt, she’s either writing or tending to her Bed & Breakfast, Hill Country Highland. Gayleen is a Travis County Master Gardener intern.


 Sheryl Williams has been a Travis County Master Gardener since 2010 and currently works as the Horticulture Program Assistant at Texas A&M AgriLife Extension – Travis County. She was introduced to gardening by her mom and grandma and has been an avid vegetable gardener most of her life. Sheryl believes that there is nothing more satisfying than growing and preparing your own food. She likes gardening in Austin year round and concedes that means pulling weeds every day. She practices organic gardening principles and enjoys the challenge of outsmarting garden pests. Occasionally she loses these battles, but doesn’t mind sharing a good meal.
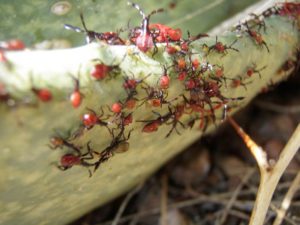
 Tent Caterpillars Start to Appear in April