How to Make Birdbaths from Recycled Materials
You can make birdbaths from recycled materials like light fixtures, pedestal sink stands, and clay roofing tiles.

Finished birdbath projects
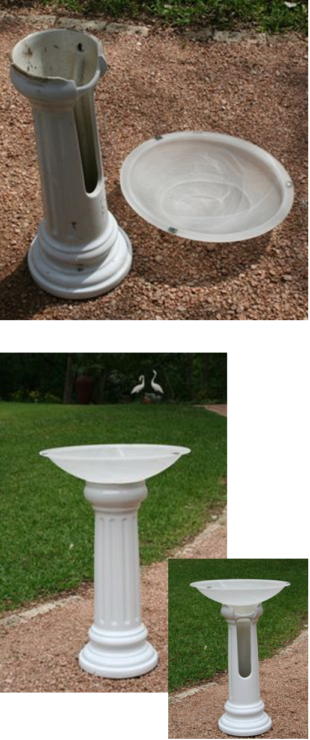 BIRDBATH #1
Level of Difficulty: 1 out of 10 (SUPER Easy)
Source: JaNet Booher
SUPPLIES NEEDED:
- Pedestal Sink Stand (from Habitat ReStore), $12.50 for this one.
- Bowl: Light fixture lens (from Habitat ReStore), $8 for this one.
- Clear Silicone Caulk: (Home Depot, $2.50)
- Total Cost: $23.50
- Total Assembly Time: 1.5 hours, excluding shopping time.
ASSEMBLY:
- Clean them up. May need a plastic scraper to remove old caulk; Clorox Clean-Up to remove prices. This took the most time.
- After the base is totally dry, place a line of clear caulk to the top of the base along the inside rim of the curved area, so that the bowl is cushioned and stabilized. (Caulk will not stick to a wet surface.)
- If you don’t want the bowl permanently attached to the base, let the caulk dry for a day before adding the bowl. An unattached bowl is easier to clean, but more prone to breakage by wildlife.
- If you do want the bowl permanently attached to the base, place the bowl on the base immediately after applying the caulk. Make sure the bowl is level. Carefully place some weights into the bowl to assure good adhesion and let it set for several hours.
- Place the birdbath in its new home.
- Fill with water, and enjoy your birds. Add a synthetic wine cork for the butterflies and dragonflies to stand on while drinking.
- NOTE: If the light lens you like has a hole in the middle, caulk around the edge of the hole and press a pretty marble or large glass bead into the caulk to seal the hole and add interest to your birdbath.
 BIRDBATH #2
Level of Difficulty: 4 out of 10 (Moderately Easy)
Source: JaNet Booher
SUPPLIES NEEDED:
- 2 Clay Roofing Tiles shaped as pictured (Habitat for Humanity ReStore, $1)
- 1 flat concrete roofing tile or 2 floor tiles of the same size. (Habitat Restore $.50-$1.00.)
- 1 light fixture lens ($6) or pretty counter-top sink ($75) (Habitat Restore). Sink stopper $2 (Home Depot (HD).
- NOTE: Color coordinate bowl with tiles.
- 1 tube Cement glue (HD $7.50).
- 2 clamps (borrow them).
- 2 flat garden stakes or 2 – 2.5’ long 1”x2” boards from Habitat Restore (maybe $1.00).
- Marbles or crushed granite rocks or other decorative filler for the glue-line. (Marbles from Settlement Home Garage Sale, $2.00; crushed granite stones from my yard path.)
- 1 tube clear Caulk (HD, $2.50)
- Total Cost:
- With light lens+marbles: $20.00;
- With sink+stones: $90.00
- Total Assembly Time: 3.5 hours in 2 parts, excluding shopping + 2 hour wait to let glue dry before attaching to the base. 3 days for final drying.
ASSEMBLY:
- Wash tiles with water and scrub brush the prior day. Tiles must be dry and clean for the glue to stick.
- Dry-assemble the two sides of the stand (curved tiles) and note where the glue should be applied. Marking with a pencil will help.
- Apply glue to the flat part of one of the tiles.
- Clamp the flat sides of the tiles together as shown in the picture, using wood stakes to protect the tiles and apply pressure all along the tiles. Don’t over-tighten or tiles may break. If one breaks, make sure it is well glued at the seam & inside at the crack.
- With the seam-side up, apply a thick line of glue to the bottom of the groove and use marbles or decomposed granite or other decorative waterproof item to hide the seam.
- Let this set-up for 2 or more hours. Meanwhile, if using floor tiles for the base, glue the two tiles together (double the thickness of the base for added strength) and let them dry.
- After letting the glue set for at least 2 hours, carefully loosen the clamps on the curved stand tiles and slide the boards to the top end of the stand and away from the bottom end. This will permit gluing the stand to the base while the glue continues to dry. Re-clamp the stand tiles together so you can move it around without stressing the glued area. (See left-photo.)
- Position the stand on the base tile(s) and align it so it looks centered and balanced. Using a pencil, draw around the inside and the outside of the stand so you will know where to place the glue on the base.
- Apply glue to the base tile using the inside line of the stand as your guide. Also apply glue where the flat part of the stand will make contact with the base.
- Place the stand on the base following your lines and glue. Clean-off excess glue from the outside of the stand and base. (Denatured Alcohol and a cloth rag will help with the final cleaning after wiping off as much as possible with paper towels and Q-tips.
- Place this assemblage where it can stay for several days. Put some weights on top so there is secure adhesion between the stand and the base. In the top-left-photo, extra tiles were used as the weights.
- After removing the clamps and weights, place a line of clear caulk to the top of the base along the inside rim of the curved area, so that the bowl is cushioned and stabilized. a. If you don’t want the bowl permanently attached to the base, let the caulk dry for a day before adding the bowl. An unattached bowl is easier to clean, but more prone to breakage by wildlife. b. If you want the bowl permanently attached, place the bowl on the base immediately after applying the caulk. Make sure the bowl is level. Carefully place some weights into the bowl to assure good adhesion and let it set for several hours.
- Plug the sink drain (if a sink is used). Paint it a matching color. If your light lens has a hole in it, caulk the edges of the hole and put a decorative marble or large bead over the hole to plug it.
- Fill with water and enjoy the birds. Add a synthetic wine cork for the butterflies and dragonflies to sit on while drinking.
Additional Ideas

