How to Make a Plant Stand from Recycled Materials
Level of Difficulty: 8 out of 10
Source: JaNet Booher
Total Cost: $20.50; $13 without glue.
Total Time: 4 hours.
Make your own plant stand from recycled materials like concrete roofing tiles or chimney pieces. ThE stand is held together by the “push-pull” method: boards push out while wires pull in. The rounded edges of the tiles require this.
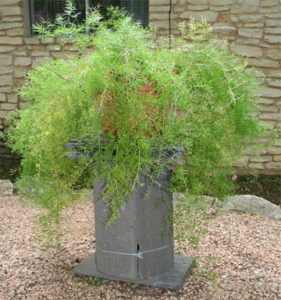
The completed project.

SUPPLIES NEEDED:
- 3 Angular curved concrete roofing tiles with one hole drilled ($.75 at Habitat Humanity ReStore).
- 3 flat concrete roof tiles ($.75 at Habitat ReStore). Don’t need holes.
- 1 tube concrete adhesive ($7.50 Home Depot (HD)).
- 1 roll 16 gauge galvanized wire ($7.50 HD)
- 4 1”x2” wooden stakes or 2 – 1”x2” about 6’ boards (Habitat ReStore, about $1.50).
- 4 ¾” galvanized washers (HD $1.25)
- 4 ½” galvanized nuts (HD $1.25)
- Use of a power circular saw, hammer, wire cutters, pliers, dispenser for the glue cylinder.
- Total Cost: $20.50; $13 without glue.
- Total Time: 4 hours.
MATERIAL PREPARATION:
Wash tiles with water and scrub brush on prior day. Glue requires a clean, dry surface.
ASSEMBLY:
- Start with the 3 angular curved tiles. On 2’ lengths of wire, fold in half and string one nut to the bend. Hold the ends together and string a washer over both wires up to the bend. Insert one through the hole in each of the tiles.
- Assemble the tiles into a circle (end up) as shown in the picture and hook the wires together as shown. Pull the wires as tight as you can by hand while making sure the edges of the tiles are butting against each other at the top and bottom.
- Cut the 1”x 2” stakes/boards so they press firmly against a seam and the opposite wall and put them near the bottom of the tiles (see photo). The board-end next to the seam will be pointed; the other end will be square. It doesn’t have to be perfectly pointed or flat.
- Tighten the wires at the top using pliers to twist the overlapping wires. A wire triangle results. Make sure the sides of the tiles stay butted together and do not overlap.
- Cut a wire long enough to wrap around the base of the stand 2½ times. Fold it in half and tie it around the bottom of the stand. Use pliers to tighten it but not break the wire. Make sure it is level around the base. See photo at left.
- Glue the bottom boards in place for extra stability.
- Cut the 1”x2” stakes and put a set at the top, held at the top by the wire triangle. Glue the ends.
- Carefully place the stand on the center of a flat tile and draw around it with a pencil. Remove the base, glue inside the line and put the stand back on the base tile and let it dry. You can move the stand to your desired location and let it dry in place if desired, but keep it dry for a day or so. Carry it by the base tile
- Before you move it, add a washer and a nut to the end of the outside wire for decoration, and using needle-nosed pliers, curl the ends of the wire under so it doesn’t snag anything.
- Put two flat tiles on top of the stand. The first tile is upside down and the second tile is right side up. One tile will work, but two looks better from all sides.
- You can add a second wire near the top around the outside of the stand, if you crave symmetry. However, as you can see from the final photo, it looks fine with just one wire.
- NOTE: If you don’t plan to move the stand very often, you could forego the glue and save $7.50.
