Why You Should Care About Oak Wilt by Linda Drga

AgriLife Logo

What is Oak Wilt and Why Do We Care About it?

Trees are a valuable resource, so we do not want to lose them to disease. Oak Wilt is caused by Bretziella fagacearum, (formerly called Ceratocystis fagacearum), a non-native invasive fungus. It can be found in MN, NY, Tx, IL, OH all together 21 states are infected. In 1944 it was discovered in oak trees in the Midwest. It is spread through the vascular (water-conducting system) roots at about 75 feet per year. All oak trees are susceptible to this infection. Live oaks, like the tree Quercus virginiana, can recover but red oaks, like Quercus falcata, are much more susceptible. Red oaks can die within two-three weeks. Oak wilt fungus is related to the fungus that causes Dutch elm disease (Ceratocytis ulmi).

How Oak Wilt is Spread

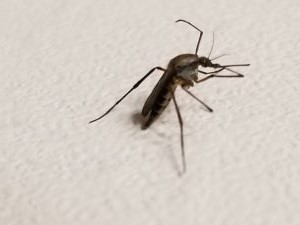
Beetles that feed on sap are a common carrier and spreader of disease.

The sap-feeding beetle that transmits the disease is the Coleoptera: Nitidulid beetle. They are pinhead size and fly for distance of one mile. The sweet smell of the sap is what attracts the beetle, which is why painting pruning cuts is an important prevention strategy. November through January are the best time to trim oaks because the beetle activity is minimal and the fungal mats are not producing as many spores.

Fungal Mats

Fungal mat crack in a red oak

Fungal mats can start to appear as cracks

The spores of the oak wilt are contained in the fungal mat. Red oak trees with rounded tipped leaves (such as Shumard, Spanish and blackjack) are some trees that form these mats when specific moist environmental conditions are present. The trees that are infected in the summer or the fall will form fungal mats during the spring. Look for small cracks to develop in the bark.

Trees that have been dead greater than a year do not produce spore mats. White and live oak are somewhat resistant to wilt and do not form fungal mats.

The Coleoptera: Nitidulid beetles feed and breed on the fungal mat and then carry the spores on their body. The beetles travel from one fungal mat to another to continue feeding.

Painting all fresh wounds immediately with pruning or latex paint provides a barrier, keeping this insect vector Nitidulid from feeding on the sap. Only fresh wounds will let the oak wilt fungus establish itself. If fresh wounds are open more than 24-hour painting will not prevent the disease.

Symptoms of Oak Wilt Disease

Live Oak symptoms showing yellow veins

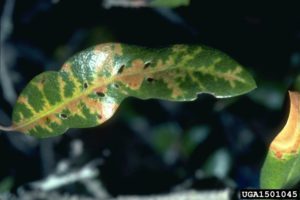
Live Oak leaf displaying symptoms of oak wilt

In Live Oaks the veins on the leaf turn yellow (chlorotic) or brown, while the remainder of the tree stays green. In red oaks, the tips of the leaves turn reddish-brown giving the appearance of autumn colors. Leaves will fall from the tree when they should be green. Inspect the leaves for the prominent yellow veins. Also smell the bark of a red oak tree if infected it should have a sweet smell. This smell is what attracts the tiny beetle to a tree.

Some of the first indications of oak wilt will be a complete leaf drop in mid-summer, as well as, discolored, wilted, and curled leaves (in the Austin area Live Oaks normally lose their leaves in March.) The disease can be noticed in the very top of the tree, then will travel down to kill suckers at at the tree base. Individual leaves may brown from the tip to the stem.

This serious, highly destructive oak tree disease can become an epidemic which kills trees in a matter of months. It can kill a red oak tree in 3-4 weeks. It can spread tree to tree through root systems that naturally graft onto one another.

Red Oak Symptoms Occur in Spring

Symptoms show up on red oaks in early May with changing leaf color from green to bronze. Development of disease usually occurs on one limb or branch and can quickly spread to the entire tree. Since summer green leaf drop is unusual, it may be indicative of an oak wilt infection. The Texas Plant Disease Handbook has pictures and descriptions of oak wilt and other diseases of oak trees. For diagnostic purposes a tree sample can be sent to the Texas Plant Disease Diagnostic Laboratory for analysis.

Oak Wilt Treatment

Some treatments are available but costly. Only high value trees warrant prophylactic and therapeutic treatments by an experienced certified arborist. Attempts to get a cheap treatment will only result in subpar results. The best thing to do may be to remove the infected tree to prevent the spread. Since oak wilt is spread through the root and the vascular system, trenching at least four to five feet deep and 100 feet away from an infected oak may help stop the disease spread. Since this disease spreads root to root, it is difficulty and expense of trenching in urban neighborhoods with building, fences, and neighbor’s yards disrupted. An infected tree can be injected with a fungicide in the Spring to possibly reduce symptoms.  Neighborhood associations or neighbors working together are the best way to manage oak wilt.

How to Protect Trees

Protect your trees by utilizing the following tips:

  1. Identify the disease early and destroy diseased trees.
  2. Avoid wounding by lawn equipment and inspect after ice and storms for damage.
  3. Always disinfect cutting tools before using on each tree with 10% bleach solution or Lysol.
  4. Paint all oak wounds immediately with a latex-bases paint to exclude the beetles. Other kinds of trees generally do not need wounds painted.
  5. Prune dead wood and twigs during dormancy. Prune only when necessary.
  6. Select well-seasoned firewood, locally acquired.
  7. Store firewood away from oak trees and keep completely wrapped in clear plastic.
  8. Do not prune oaks after February 1st to July 1st or from September to after first hard freeze (on average the first week of December.)
  9. Buy firewood locally and ask where the wood is from to prevent disease spread. Only store disease-free one-year-cured oak wood.

Proper Firewood Handling Prevents Disease Spread

Firewood taken from oat trees that have a fungus mat can spread the disease. Cracked wood or bark falling off wood indicates that the fungus will no longer be alive. If you don’t know the source or type of firewood, cover the wood pile completely with clear plastic. Anchor the edges of the plastic into the soil to prevent insect spread.

A dying tree cannot support the growth of the oak wilt fungus but can still contain the disease. Avoid cutting up a dead branches and trees until the coldest part of winter. Do not store Oak wilt infected wood, burn it as soon as it is dry. Burning the wood kills all spores and beetles. Beetles active in freshly stored wood can fly away to infect healthy trees. Smoke from the wood does not transmit disease.

If You Need to Prune Your Oak Trees…

Not all trees need maintenance. If you absolutely must prune your oak trees, keep the following in mind:

  1. Prune trees during the hottest part of the summer or the coldest part of the winter when the fungal mats are least likely to form.
  2. Prune for safety on roadways and streets by removing low branches that may be hazardous to large vehicles like fire trucks.
  3. Remove dead and diseased branches which left in place can attract sap beetles that spread Oak Wilt fungus.

Know Your Oaks Before You Buy

Oak wilt is devastating to live and red oaks. Once a tree is diseased it is extremely difficult and maybe impossible to treat.

When planting, it is best to avoid a monoculture by varying the types of plants and trees in your landscape. There are two great resources available to help you choose the right tree for your location.

Texas oak wilt .org has a list of tree species for each Texas Ecoregion. If you live on the west side of I-35, choose the Edwards Plateau ecoregion. If you live on the east side of I-35, choose the Blackland Prairies ecoregion. If you really want to have an oak tree, plant one that is less susceptible to the disease such as white oaks, chinquapin, Monterrey (also known as Mexican White Oak,) or lacey oaks.

The city of Austin has a Native tree guide for Central Texas with many helpful suggestions and illustrations of the trees. You can learn more about each tree by visiting the Native and Adapted Landscape Plant Guide database.

Additional Resources

Oak Wilt Assistance and Arborists:

https://texasoakwilt.org

https://isatexas.com

More About Oak Wilt:

City of Austin Oak Wilt Information: http://www.austintexas.gov/page/oak-wilt

City of Austin Grow Green Program: http://www.austintexas.gov/department/grow-green

Texas A&M Forest Service: http://tfsweb.tamu.edu/

About Linda Drga

Linda Drga is a Lifetime Member of the Travis County Master Gardeners Association. She grew up on a Pennsylvania truck farm and spent her youth working with vegetables. She has a degree in nursing and a MPH (Masters in Public Health) from Tulane. She spent 20+ years living and gardening in South American, the Caribbean, and Africa. She says gardening is her escape and how she keeps her mind at ease. She loves to get dirty in her garden but still dedicates time every day to study and learn something new.

Leaffooted Bugs Common in Summer Vegetable Gardens by Wizzie Brown

AgriLife Logo
leaffooted bug specicimen

Figure 1: Leaffooted bug displaying the flattened leaf-like back legs.

Leaffooted Bugs and Stink Bugs Closely Related

Leaffooted bugs are sometimes mistaken for stink bugs, which are a closely related insect. However, Leaffooted bugs are larger than stink bugs and have an elongated body. Some leaffooted bugs have an expanded region on their hind leg that looks similar to a leaf, hence the name leaffooted bug (Figure 1).

Identifying Traits

Adult insects are fairly large and grayish-brown. Immatures, or nymphs, look similar to adults, but may differ in color and lack the expanded region on the leg until closer to adulthood (Figure 2). Nymphs also lack fully developed wings. Leaffooted bug nymphs look very similar to Assassin Bug nymphs, which are a beneficial insect. You can tell the difference by their behavior. Assassin Bugs usually are found by themselves, leaffo0ted bugs are found in large groups.

Leaffooted Bug Adult and Nymphs

Figure 2: Leaffooted Bug Adult and Nymphs

Tomatoes Are a Favorite Target

These bugs feed on a variety of fruits, nuts and seeds, but we most often get calls from people who have them on tomatoes, peppers or sunflowers. The insects have piercing-sucking mouthparts and puncture fruit or seeds to suck out plant juices. The opening left behind can allow access to secondary invaders or rot.

Best Ways to Control

There are three ways you can manage these insects:

  • hand-picking (be sure to wear gloves if utilizing this method),
  • sucking off the plant with a hand-held vacuum,
  • spraying plants with pesticides. If choosing to use a pesticide, read the product label and make sure it can be used in the area you are treating (i.e. vegetable garden).

Additional Resources

Leaffooted Bug Field Guide

Integrated Pest Management

Fall Armyworm Populations Active in Austin Area

AgriLife Logo
an armyworm can be light tan to light green with a brownish-black head

An armyworm can be light tan to light green with a brownish-black head.

Fall armyworm larvae, or caterpillars, are light tan to light green with a brownish-black head. These caterpillars have a white line between their eyes that forms an inverted Y-shape. Larvae have yellowish and black banding along their body as well as four large spots at the end of the abdomen. Adults are small moths with a wingspan of 1.5 inches with mottled brownish-grey wings.

how to identify fall armyworms

These caterpillars have a white line between their eyes that forms an inverted Y-shape.

Fall armyworms overwinter in the pupal stage in south Texas. Once adults emerge from the pupal stage, they migrate northward during spring as temperatures rise. Larvae feed for about 2-3 weeks and then enter soil to pupate.

Many Types of Plants Attacked

Armyworms attack many types of plants. Small larvae feed on the green layer of leaves, causing a windowpane effect while larger larvae completely strip leaves. The last two larval stages eat about 85% of the total foliage consumed. Fall armyworms feed any time during the day or night but are most active in early morning or late evening. Fall armyworms strip foliage from plants and then move onto a new food source. With high populations, larvae appear to march side by side to new food sources, thus giving them the name of armyworm.

Outbreaks Tied to Rain or Irrigation

Various predators help keep armyworm populations from becoming too large. Parasitoids, such as wasps or flies, lay their eggs in armyworm eggs and/ or larvae causing death of the developing egg or larvae. Predators, such as ground beetles, also help reduce armyworm numbers by eating larvae. Many other animals like birds, skunks, and rodents consume large numbers of armyworms. Even with these natural controls, there are certain conditions that can cause outbreak populations. Typically outbreaks occur for fall armyworms in late summer or early fall after heavy rain or irrigation.

Control Options to Fight Armyworm Attack

To determine if populations are high enough to justify control, count the number of armyworms in a square foot for 8 different areas. Thresholds for lawns can vary, but treatment should be considered when there are 3 or more larvae per square foot. Look for products labeled for armyworms for use on lawns or turf. Active ingredients may include Bacillus thuringeinsis var. kurstaki, spinosad, bifenthrin, cyfluthrin, carbaryl, or permethrin.

For more information or help with identification, contact Wizzie Brown, Texas AgriLife Extension Service Program Specialist at 512.854.9600.

Additional Resources

Armyworms in Turfgrass article by Insects in the City

Texas Vegetable Garden Insects Guide

Tomato Time – Join us for an EPIC Tomato Talk

AgriLife Logo

Plant or Plan – Think About Next Tomato Crop Now

Juane Flamee Tomato

Juane Flamee Tomato

Savvy Central Texas Gardeners know that we actually have TWO gardening seasons here in Austin. The first starts around February 25th and ends with the arrival of summer. The second garden season starts in late August or September and ends with the arrival of the first frost on about November 29th. Unfortunately, our summers are just too hot for most plants and gardeners.

There’s a Reason Your Tomato Harvest Dwindles in the Heat

Tomatoes are a good example of plants that just don’t like the heat. For people from the north that sounds crazy. But the reality is that many tomato varieties have a survival mechanism that kicks in when nighttime temperatures start to exceed 76 degrees. The heat stress causes pollen to become sterile. Tomato breeders have responded with some varieties that handle the heat better than others, but in these days of extreme temperatures, yields are often reduced. Interestingly enough, cherry tomatoes don’t seem to suffer the same effects.

All of this means that you might as well just pull up your tomato plants once you’ve picked the last fruit in late June or July and start back in August or September with a new transplant.

Learn How to Grow Your Own Epic Tomatoes from the Expert – Craig LeHoullier

With this in mind, we’ve scheduled a very special guest to help you up your tomato game. Craig LeHoullier is a garden author and popular lecturer on growing tomatoes and other vegetables. His book, Epic Tomatoes, is a favorite of many of our Travis County Master Gardeners. In addition to writing, Craig is a tomato advisor for the Seed Savers Exchange and co-leads the Dwarf Tomato Breeding project.

We’ve scheduled him for a September 1 webinar on “Epic Tomatoes from YOUR Garden – some history, stories, and tips and tricks for success”.

Epic Tomatoes by Craig LeHoullier

Packed with photos from his various gardens, Craig will spend the first half talking about the tomatoes themselves, providing all you will need to plan your own successful tomato adventure. After a question break, Craig will return to share how to make it all happen, from planting seeds to harvesting and saving seeds, including different ways to grow your crop – traditional garden or raised bed, container or straw bales – ending with some favorite recipes. Be sure to have all of your tomato growing questions ready.

Click Here to Register Now for Early bird Price of $25

Program cost is $25, increasing to $35 on August 30. Due to technological constraints, the webinar has a limit of 100 attendees. Only registrants can access the live session. Once the live session has reached capacity, a recorded version will be available for purchase.

There will be a short break at approximately 11 am. The webinar will end at 12:00 pm.

You can submit questions during the webinar and get answers live as time allows. Afterward, questions that don’t make it to the webinar will receive emailed answers.

About Craig LeHoullier
Craig LeHoullier holding epic tomatoes

Craig LeHoullier lives and gardens in Hendersonville, North Carolina (as of January 2020; prior to that, he and his wife and pets resided in Raleigh, NC, for 28 years). A Rhode Island native, he caught the gardening passion from his grandfather, Walter, and dad, Wilfred. Craig achieved his PhD in chemistry at Dartmouth College, which resulted in a 25 year career in pharmaceuticals that ended in 2008.

Craig’s gardening obsession, which started the year he and Susan were married (and their first garden, in 1981), is passing through several stages. His love of heirloom tomatoes began with his joining the Seed Savers Exchange, an organization for which he continues to serve as adviser for tomatoes, in 1986. He is responsible for naming and popularizing many well known tomatoes, such as Cherokee Purple.

In 2005 he added amateur tomato breeding to his garden resume, and continues to co-lead the Dwarf Tomato Breeding project, responsible for creating 125 (and counting) new compact growing varieties for space-challenged gardeners. His writing career kicked off with a 2012 request from Storey Publishing to write a book on tomatoes, resulting in Epic Tomatoes (2015). His second book, Growing Vegetables in Straw bales, soon followed (2016). Book 3, focusing on the Dwarf Tomato Breeding Project, is in progress.

His current and upcoming projects include a self-published garden cook book, a weekly Instagram Live each Friday at 3 PM Eastern from his garden, and additional opportunities on podcasts, webinars and speaking opportunities, as they arise.

Additional Resources

Buy Epic Tomatoes directly from Craig LeHoullier

Sign up for Travis County Horticulture Event Notifications

Monthly Gardening Calendar for the Austin Area

Top Tips for Terrific Tomatoes

Vegetable Gardening in Austin

Vegetable Gardening Calendar

Top Performing Vegetable Varieties

Beat the Heat by Watering From the Bottom Up By Kirk Walden

AgriLife Logo

Reservoir Planters Help Beat the Heat

Group of pots with reservoir inserts

Figure 4: These planters utilize reservoir inserts.

When I moved to Austin in 1998, our first house had a balcony outside our master bedroom. I was delighted that I would be able to wake up every morning to a beautiful array of flowers arranged in pots right outside our windows. It worked well in March. By June, I was watering the pots twice a day. By August, I couldn’t keep anything alive. That’s because the balcony faced due west and had no roof. I gave up until fall.

It was years later that I discovered the solution — reservoir planters, sometimes called self-watering pots. These pots come in various shapes and sizes and all include a false bottom, below which is a chamber filled with water. You water from the top as usual. And, you water from the bottom up, by filling the chamber from a tube at the top of the planter. As the water begins to evaporate, it is drawn up through soil, keeping it moist longer, even in the scalding sun and heat of an Austin August.

Build Your Own Grow Box

My first reservoir planter looked much like the tub style in Figures 1 and 2.

grow box style reservoir planter

Figure 1: Reservoir planter modeled after the Travis County Master Gardener Grow Box.

reservoir planter with single wicking hole

Figure 2: Reservoir planter with single wicking hole in the converted plastic tote box.

To my amazement, I went from watering twice a day, to watering every other day. I enjoyed healthy daisies and bright salvias all summer.

Convert Regular Pots to Reservoir Planters

illustration of how to include a water reservoir

Figure 3: You can convert almost any existing container.

These days there is an array of clever options that incorporate the reservoir chamber, as seen in Figure 4. You can convert a regular pot into a reservoir planter using an insert as shown in Figure 3.

Go Big!

On a larger scale, reservoir planters can accommodate practically any plant. Last year, I found a wound-trunk, tree-like bougainvillea. Then, I found the pot in Figure 5. Note in Figure 6, not only does it have a false bottom, but it also has cellulose tubes that rise into the soil for more evenly dispersed watering. In Figure 7, see that the fill tube also has a bob gauge to tell you when it’s time to refill. Figure 8 is the finished product. In full sun, the bougainvillea can go five days between watering.

large pot

Figure 5: Don’t be afraid to go big!

cellulose tubes inside the planter

Figure 6: Cellulose tubes help to disperse water.

planter bob gauge attached

Figure 7: This fill tube an bob gauge indicates when water is needed.

bougainvillea trained as a standard in the reservoir planter

Figure 8: The reservoir planter allows this bougainvillea to flourish.


Use Blocks in Really Big Planters

This year, I was emboldened to try an even larger scale. How can the four-foot-tall pot in Figure 9 be self-watering? By utilizing a cinder block to support a specialized insert. The two-foot-tall insert is in three parts. The two nesting pieces in Figure 10 combine to create the reservoir with watering holes on each side, Figure 11. Then a cellulose fabric liner, Figure 12, is added to aid in moisture wicking. A cinder block is placed on end inside the exterior pot, Figure 13. The reservoir planter sits atop cider block, Figure 14. In the part-sun conditions on the porch, the succulents can go a week or more without adding water.

tall planter with succulents

Figure 9: Giant pots can be adapted with reservoirs.

two nesting pieces form the reservoir

Figure 10: These two pieces nest together inside the planter.

fully assembled reservoir showing top watering holes

Figure 11: The fully assembled reservoir features watering holes at top.

Fabric liner for the plant reservoir

Figure 12: A cellulose fabric lines the reservoir.

cinder block placed inside planter

Figure 13: A cinder block is placed inside planter to hold up reservoir.

succulent plants inside the reservoir

Figure 14: Even succulents can use a little watering help in Austin summers.

Reservoir planters might not be suited to every situation. But, they’re an effective defense against the dog days of summer. Just like an ice-cold glass of lemonade. Bottoms up!

About Kirk Walden

Kirk Walden

Kirk is a hands-on experiential gardener. While he appreciates the cerebral aspects of gardening, he revels in the visceral experience of digging in the dirt. When he moved to Austin in 1998, the home had virtually no landscaping, mostly just limestone and cedars. His determination to beautify it led to an avocation as a serious gardener that culminated in Travis County Master Gardener Certification in 2014.


Additional Resources

Watch Kirk’s webinar: Drought to Deluge: Water-Wise Ways

Monthly Gardening Calendar for the Austin Area

How to Water Efficiently in Central Texas – tables listing water output and methods

Water Education in Texas – information hub from Texas A&M AgriLife Extension

Earth-Kind® Drought Preparedness

Texas Evapotranspiration Network – use for weather information, current and average evapotranspiration data, and irrigation watering recommendations

The Texas Manual on Rainwater Harvesting – from the Texas Water Development Board

Making a Rain barrel – from Texas A&M AgriLife Extension

Basic Landscape Design

In the July Vegetable Garden by Patty Leander

AgriLife Logo
Colorful pepper harvest

Healthy peppers, eggplant and small-fruited tomatoes that are mulched and watered through the summer will produce a bumper crop this fall.

It’s Time to Take a Break in the July Vegetable Garden

For most gardeners July is a slow month in the vegetable garden, some might call it a dormant season. The heat and lack of rain can adversely affect growth and pollination, so after the tomato harvest winds down, the beans peter out and the squash succumbs to heat and pests, it’s a good time to take a break and focus on the upcoming fall season.

Start Planning the Fall Garden

Check your seed inventory and peruse seed catalogs for varieties you want to plant. Vegetables for the fall garden include broccoli, cauliflower, cabbage, collards, kale, beets, Swiss chard, carrots and sugar-snap peas, as well as bush beans, cucumbers and summer squash. In choosing frost-tender varieties look for those that have a short ‘days to harvest’, generally less than 65 days, so that plants have enough time to mature and produce before the first anticipated frost in Central Texas, which typically comes the end of November or first week of December.

July Vegetable Garden Checklist:

Water
  • Irrigate deeply and as infrequently as possible to encourage deep root growth.
Soil
  • Mulch all bare soil. Clean up spring planting beds and add a layer of compost, then mulch.
Fertilize
  • Over-fertilizing in summer is a common plant killer. Excess fertilizer (especially nitrogen) can burn plants in dry weather. This happens because the salts in fertilizer draw moisture out of plants that they are not able to replenish from soil moisture or retain due to evaporation on hot days. Lack of moisture results in scorched leaves resembling fire damage, or “burn”. Use liquid fertilizers and be sure to water deeply.
Plant/Transplant
  • Tomato transplants should be planted in the garden by late July or early August in order to set fruit and produce a harvest before the first freeze. Unruly tomato plants that are still in good condition can be cut back to one-third of their height to encourage healthy, new growth.
  • Zinnia flowers

    Plant zinnia seeds now for a vivid fall display.

    Plant a small patch of zinnia or marigold seeds later this month and enjoy their vibrant blooms in the fall garden. A small grouping of plants is easy to tend to (they will need to be watered regularly) and will make a colorful impact when they start to bloom.

  • Sketch out a rotation plan for growing vegetables. Crops within the same family are often susceptible to the same pests or diseases. Moving or rotating them to a different location helps break the pest/disease cycle.
  • Broccoli seedlings

    It takes about 6 weeks to grow a broccoli or kale transplant from seed.

    Save money by growing your own transplants of cole crops indoors under grow lights. Start planting seeds of broccoli, cauliflower, cabbage and other cole crops later this month so they will be ready for setting in the garden by mid-September.

Diseases/Pests to Look For
  • Spider mites thrive in dry, hot conditions and the warmer days will make aphids prevalent on stressed plants. Remove both with blasts of water to the underside of leaves. Remove any heavily infested plants from the garden.
Maintenance
  • Pull up any tomato plants that are infested with pest damage or disease. Whatever malady they are suffering from will get worse, not better, during the stress of summer heat. Use green tomatoes for roasted tomato salsa, chow-chow relish, fried green tomatoes, or chop and add to a vegetable sauté.
  • Peppers and eggplant handle Texas heat better than tomatoes. Keep them watered and mulched and, even if they pause production during summer’s peak, they will power through and produce a bumper crop this fall.
  • Maintain a small oasis for feathered friends. Whether a birdbath or a shallow saucer, provide fresh water daily during the summer. Place the birdbath in an open area with shrubs or trees nearby where birds can have easy access and observe possible threats.
Harvest
    • White and red potatoes

      Check stored potatoes and onions occasionally for signs of spoilage

      Don’t let one rotten onion or potato spoil the whole bunch. Check your stash of onions or potatoes occasionally for signs (or smells) of rotting.

    • Harvest okra pods frequently before they get too big; over-grown okra is tough and stringy.
Cucumbers ready to cut up for salad or infusions

Save the perfect cucumbers, such as the ‘Suyo Long’ at the bottom, for salads and dips and slice the not-so-perfect specimens for infused water.

    • Moisture stress, excess heat and poor pollination can cause misshapen cucumbers. While they may not be the cream of the crop, they are perfect candidates for infused water. Add thin slices of cucumber and lime to a jar or pitcher of water, add a few springs of mint and chill for a refreshing and hydrating beverage. Refill with water throughout the day and toss in the compost when the infusion has lost its freshness.

Additional Resources

Watch the Vegetable Gardening in Central Texas Webinar

Recommended Vegetable Varieties for Travis County

Vegetable Seed Sources

Vegetable Gardening in Austin

Plant Rotations, Successions and Intercropping

Sustainable Food Center Farmers Markets

Texas Farmers Markets

Monthly Gardening Calendar for Austin and Central Texas

In the Vegetable Garden with Patty G. Leander


Patty G. Leander is a contributing editor for Texas Gardener magazine and an active member of the Travis County Master Gardeners Association with an Advanced Master Gardener specialty in vegetables. She has been growing vegetables year-round in her Austin garden for over 20 years, encouraging the use of sound, horticultural principles that will lead to a bountiful harvest.

Mosquito Repellents by Wizzie Brown

AgriLife Logo
Mosquito

Protect yourself with the proper mosquito repellents

Mosquitoes are out in masses and since they are capable of disease transmission, it is important that you protect yourself when spending time outside. Of course, you can wear long pants and a long-sleeved shirt in light colors to reduce the number of mosquitoes that can reach your skin when outside, but this is not always the option people choose with temperatures on the rise. Another option to protect yourself is mosquito repellent.

How to Properly Apply Mosquito Repellent

Apply repellent only to clothing and exposed skin; do not apply repellent underneath clothing! If you want to apply repellent to your face, spray your hands with repellent and rub it onto your face. Do not spray repellent directly into your face or near eyes or mouth. Make sure to apply repellent outdoors. Do not allow children to handle repellents and seek advice from a physician regarding insect repellent use for children under two years of age. Wash hands before eating, smoking, or using the restroom.

Look For These Active Ingredients

To reduce disease transmission from mosquitoes, the Center for Disease Control (CDC) recommends using a product registered with the EPA (Environmental Protection Agency) containing one of the following active ingredients: DEET, picaridin, IR3535, oil of lemon eucalyptus (OLE), para-methane-diol (PMD), or 2-undecanone.

DEET

DEET, also known N, N-diethyl-m-toluamide or N, N-diemethylbenzamide, was developed by the U.S. Army in 1946 to protect soldiers in insect-infested areas. Pesticides containing DEET have been used by the public since 1957. Do not use DEET products on children younger than 2 months of age (read the label and check with your pediatrician if you have questions). DEET has a slight odor and may have a greasy feel to some people. It may damage plastic, rubber, vinyl, or synthetic fabrics. DEET may be irritating to the eyes and skin for some people and comes in a wide variety of concentrations, so choose one that will work best for your situation.

Picaridin

First made in the 1980’s, Picaridin resembles a natural compound called piperine (found in plants used to produce black pepper). It has been used in Europe and Australia for many years but has only been in the U.S. since 2005. Picaridin is non-greasy and odorless.

IR-3535

IR-3535, or 3-[N-Butyl-N- acetyl]-aminopropionic acid, ethyl ester, was developed in the mid- 1970’s and became registered for use in the U.S. in 1999. It is registered as a biopesticide by the EPA because it is functionally identical to a naturally occurring substance (an amino acid). It may dissolve or damage plastics and may be irritating to the eyes.

Oil of lemon eucalyptus (OLE) and PMD

Oil of lemon eucalyptus (OLE) and PMD (para-menthane-3,8-diol) are essentially the same thing; PMD is the synthesized (lab created) version of oil of lemon eucalyptus. “Pure” or “essential” oil of lemon eucalyptus is not labeled as a repellent and has not undergone testing and should not be used as a repellent product. OLE/PMD has been on the market in the U.S. since 2002. Do not use OLE/PMD products on children younger than 3 years of age. The natural product (OLE) has known allergens within it while the synthetic version (PMD) has less of a risk to allergens. This product is classified as a biopesticide. OLE/PMD has a varying range of residual, some offering about 20 minutes of protection while other products may last up to two hours.

2-undecanone (AKA methyl nonyl ketone or IBI-246)

The product 2-undecanone is also known as methyl nonyl ketone or IBI-246. It is a colorless oil that can either be produced synthetically or extracted from plants such as rue, cloves, ginger, strawberries, or wild grown tomatoes. This product is fairly new to consumers.

How Long Will it Last?

Many factors play into how long a repellent will last for a person. Some of these are:

  • The concentration (or percent of active ingredient) of the product. You can find the percentage on the product label.
  • Person’s attractiveness. Some people are more attractive to mosquitoes than others (and no scientific research has proven that it is because of eating garlic, taking vitamin B, using tobacco products, etc.). A person’s genetic code plays a large part on what makes a person so attractive to mosquitoes.
  • Frequency and uniformity of application. In other words, how often is the repellent applied and how good of coverage did you get?
  • Activity level of the person. The more active the person is, the more sweat they produce which can cause the repellent to wash off the surface of the skin.

Word of Caution about Product Combinations

As a word of caution, there are products that combine sunscreen and insect repellent. The CDC recommends that if you need sunscreen and repellent, that you choose two separate products. Reapply sunscreen more often than repellents.

For more information or help with identification, contact Wizzie Brown, Texas AgriLife Extension Service Program Specialist at 512.854.9600. Check out her blog at www.urban-ipm.blogspot.com

This work is supported by Crops Protection and Pest Management Competitive Grants Program [grant no. 2017-70006-27188 /project accession no. 1013905] from the USDA National Institute of Food and Agriculture.

The information given herein is for educational purposes only. Reference to commercial products or trade names is made with the understanding that no discrimination is intended and no endorsement by Texas A&M AgriLife Extension Service or the Texas A&M AgriLife Research is implied.
The Texas A&M AgriLife Extension Service provides equal access in its programs, activities, education and employment, without regard to race, color, sex, religion, national origin, disability, age, genetic information, veteran status, sexual orientation or gender identity.

Additional Resources

Urban IPM – Blog by Wizzie Brown

Integrated Pest Management

Insects in the City

About Wizzie

Wizzie Brown

Wizzie Brown
County Extension Program Specialist – Integrated Pest Management
Email:EBrown@ag.tamu.edu

Wizzie has been with Texas A&M AgriLife Extension Service since 2002 and has been playing with insects since she was a toddler. She is an Extension Program Specialist with the Integrated Pest Management (IPM) program. Wizzie holds a B.S. in entomology from The Ohio State University and a M.S. in entomology from Texas A&M University. The integrated pest management program provides identification, biological and management information to whomever needs help. Wizzie’s research focuses on imported fire ants, including community wide fire ant management. Wizzie also is happy to provide programs to area groups on a variety of arthropod-related topics. You can find insect and other arthropod information on Wizzie’s blog.

In Austin’s May Vegetable Garden by Patty Leander

AgriLife Logo
yard long beans for the may vegetable garden

Yard long beans, also known as asparagus beans, can take the heat of a Central Texas summer. These beans are related to Southern peas and grow long, slender pods. Harvest before the beans inside enlarge – no shelling required.

Hurray for the May vegetable garden! The rush of spring planting has passed, the chance for unexpected cold snaps is over and we are headed toward summer and the much-anticipated vegetable harvest.

May Vegetable Garden Checklist

WATER
  • Conserve water by using drip irrigation or soaker hoses to deliver moisture to the root zone and avoid overhead watering which may encourage disease. If you have automatic irrigation, be sure to turn it off when rain is in the forecast.
FERTILIZE
  • Help vegetable plantings along by providing consistent moisture and fertilizer. Unlike shrubs, trees and perennial plants that grow and mature over several months or years, vegetables are grown from seed to harvest in a very short span and plants respond favorably to frequent (every 3-4 weeks) applications of fertilizer. A water-soluble garden fertilizer or fish emulsion, prepared according to package directions and watered into the root zone, is an easy way to feed plants.
MAINTENANCE
  • Keep up with weeds that invade planting beds – they will take water and nutrients intended for vegetables. Pull up or hoe when they are small, before they have a chance to produce seed.
  • Utilize tender weeds and fresh grass clippings in the compost pile as a “green” (nitrogen source). Mix or layer with a “brown” (carbon source) such as dried leaves, shredded newspaper, organic straw and/or chopped dried plant material.
DISEASES/PESTS TO LOOK FOR
male and female squash blooms

An immature squash develops at the base of the female bloom on the left.

  • Observe the flowers on squash plants. Male blooms – bright yellow flowers atop long, slender stems – are usually the first to appear. The female blooms, which have a miniature squash fruit at the base of the flower, will soon follow. The female flower must be pollinated in order for the fruit to develop. If you covered squash plants to protect from squash vine borer damage uncover once you see female blooms so that pollinators have access to blooms. Squash will be ready for harvest a few weeks after pollination.
PLANT
malabar spinach climbing on a trellis

Malabar spinach produces dark green, succulent leaves all summer long.

  • Plant Malabar spinach, amaranth or molokhia for summer greens that can be used in salads, wraps, omelets or casseroles. Harvest the leaves when they are young and tender, before they have a chance to go to seed.
HARVEST
  • Potatoes planted in February should be large and vigorous by now. In the next few weeks check the base of the plants for new potatoes – if they are big enough to eat carefully harvest a few individual tubers without disturbing the plant. The remaining tubers can be harvested when they have increased in size and the tops begin to yellow, which generally happens in early June.

Additional Resources

Recommended Vegetable Varieties for Travis County

Vegetable Seed Sources

Vegetable Gardening in Austin

Sustainable Food Center Farmers Markets

Texas Farmers Markets

Monthly Gardening Calendar for Austin and Central Texas

In the Vegetable Garden with Patty G. Leander


Patty G. Leander is a contributing editor for Texas Gardener magazine and an active member of the Travis County Master Gardeners Association with an Advanced Master Gardener specialty in vegetables. She has been growing vegetables year-round in her Austin garden for over 20 years, encouraging the use of sound, horticultural principles that will lead to a bountiful harvest.

Micro-Orcharding in Urban Growing Spaces by Reed Burnam

AgriLife Logo

Micro-Orcharding: Stacking Edible Diversity into Suburban and Urban Growing Spaces

A micro-orcharding example with several fruit trees planted close together

Author’s backyard orchard in Spring 2020. Pictured L-R: Florida King Peach, Orient
Pear, Methley Plum, Saturn Peach, Santa Rosa Plum

“Micro-Orcharding” is a high-density planting technique that allows for maximum diversity in fruit and nut crops in smaller planting spaces. This method works well in the city and suburbs where space is at a premium, but is useful anywhere.

The concept is simple – you plant trees closer together than recommended. Then you keep the size of individual trees smaller year on year. This helps to maintain spacing and light whilst maximizing fruit diversity. Consistently reducing the size of a fruit tree will result in less fruit each year due to smaller canopy size. But the fruit that grows is more accessible and the increased numbers of trees can make up for smaller yields. Chances are, you can productively fit more trees into your suburban garden than you may have thought.

Benefits to Diverse Micro-Orcharding

There are many benefits to packing in a diversity of tree types into your garden space:

  • Increased variety of fruit available in a small space
  • Additional types of trees for cross-pollination purposes
  • Extended blooming and harvest season using different cultivars and varieties
  • Smaller trees in the garden can offer some shade protection to other heat susceptible plants
    in late Summer
  • A wider diversity of plantings in the garden, which is generally beneficial for your whole
    garden ecosystem

Choose the Tree for the Space

Choosing the trees that are right for your space will take some planning upfront. Make sure and plant trees that perform well locally and conform to your individual light and water conditions. See Fruit Varieties for Travis County for recommendations.

Make use of any micro-climates you have, as with citrus on a sunny south facing wall, heat-loving pomegranates on west facing exposures, or using deciduous species in north facing alleys between homes that only get light part of the year. Planting cultivars of the same species that fruit at slightly different periods can help stretch out the harvest, such as with different peach varieties like June Gold (June ripening) and La Feliciana (July ripening). For micro-orcharding, you can think of your trees more as large “fruit bushes”, rather than full size trees.

Dwarf varieties of individual fruit trees can be helpful as well, but are not necessary with regular pruning to keep the canopy open. Espalier techniques are another way to effectively use vertical spaces in smaller yards, also.

Maintenance Requirements for Micro-Orcharding

So the obvious next question is – how much maintenance will this take? It will take some effort to deal with the additional trees, though not as much as one would think. At planting, trees can be placed at about a 6’ – 8’ distance from one another. This is much less than the 20′ apart that many varieties normally recommend.

Early training of your fruit trees at planting is important in this method, to keep trunks squat and canopies lower. Generally, trees should be kept pruned down to below 10’ tall at all times, with a spread of about 6’ – 8’. A good rule is to keep the upper canopy of any fruit tree in your yard within your maximum reach by hand (about 6’ – 9’h for most people). There will be yearly maintenance thereafter – usually a hard prune in winter, and some years a smaller pruning during the growing season after harvest.

Learn the Growth Habit for Proper Pruning

Peach tree pruned with open vase method

Winter pruning of 5 year old June Gold peach

Different trees have different growth habits that determine the pruning and training methods that should be followed. Examples are open vase, central leader, and modified leader. Information on how to do this is available from the Aggie Horticulture Fruit and Nut Resources page.

If you’re wondering how this affects the health of the tree – many fruit trees respond well to frequent hard pruning, especially stone fruits, which do particularly well in our area. Driving through the Hill Country peach orchards, you might notice that no tree is allowed to grow to its maximum height, for the reasons listed above. Other tree types can be shaped over time to maximize production on a semi-permanent smaller frame.

In the more compact urban or suburban garden, smaller and more open trees have the added benefit of not blocking all the light coming into the garden, and can act as some much-needed late afternoon shade to more sensitive perennials and annuals. An additional benefit of all the regular pruning is lots of yearly mulch material is generated for the garden or compost bin – a small electric chipper is great to have around for this reason.

Choose the Right Variety

Major consideration should be given to what works well for your general area before planting a bunch of fruit trees in your yard. Luckily for us in Central Texas, there are lots of varieties that work very well and can be incorporated into this type of system. Peaches, plums, loquats, persimmons, pears, asian pears, pomegranates, and even cold hardy citrus (for the brave after the recent deep freeze) will work nicely in the micro-orchard.

Backyard orchard culture fits very well into an overall plan for stacking density and variety into your landscape, and can expand the playing field for gardeners in the city that want more edible varieties to choose from.

Additional Resources

Backyard Fruit and Nut Production for Austin Area

Fruit Varieties for Travis County

Chill Hours for Austin area

Aggie Horticulture Fruit and Nut Resources

About Reed Burnam

Reed Burnam

Originally from Houston, Reed has been in Austin for 20 years, with short stints living in Southern California and Northern India. He holds BAs in History and Philosophy, and an MA in South Asian Cultures and Languages, all from UT Austin. He’s been designing, installing, and maintaining professional landscape plans for clients around Austin since 2013, working with Austin-based Fertile Ground Organic Gardens. Hands in the soil most of his life, he has a love and appreciation for all forms of life, even poison ivy, yellowjackets, and fire ants. Reed became a Travis County Master Gardener in 2019 and has been thoroughly enjoying the volunteerism, connections, and further learning the program has offered.

Reed is an avid enthusiast of regenerative gardening, urban orchards, rainwater harvesting, forest gardening, composting, backyard poultry, and edible landscaping. He has taught permaculture design both locally in Austin and internationally since 2013, and teaches yearly PDCs with friends in India when there isn’t a global pandemic happening. Reed currently resides in South Austin, where he lives with his wife, more fruit trees than he cares to count, and a small herd of domestic animals.

For the Love of Roses by Carolyn Williams

AgriLife Logo
Rose 'Heritage' flower bud which will fuel your love of roses

‘Heritage’ Rose

The love of roses is a subject that captivates gardeners and poets alike. Ralph Waldo Emerson wrote, “There is simply the rose; it is perfect in every moment of its existence.”

This is my fourth post on roses. I hope I’ve answered a few basic questions in order for you to have enough rose knowledge that you can either plant a new rose or help an older established one produce better sweet smelling roses.

Fertilizer Basics

Have your soil tested so that you know how much fertilizer you should be applying. Fertilizers are labeled with three numbers that represent the amount of N(itrogen), P(hospate), and K(Potassium). Read the labels and then use this tool with your soil test results to see how much you should apply. Even organic fertilizers should be labeled.

I’ve listed some common organic sources in this table:

Common Organic Sources for N, P, K

Nitrogen Phosphate Potassium
 

Alfalfa Meal

Blood Meal

Fish Emulsion

Fish Meal

Seaweed

Manures


Colloidal Phosphate (Also called Rock Phosphate)

Manures


Greensand

Alfalfa Meal

Seaweed

Compost is not considered a fertilizer, which is why labeling is not required. The nutrients in compost are greatly dependent on the ingredients used to create it, which can vary widely. Most compost contains some low amounts of all three, but use it to improve your soil structure or as a mulch rather than as a fertilizer. You can get your compost tested, but unless you use the exact same ingredients every time, the amounts of N, P, K will vary by batch.

No matter which fertilizer you choose,  lightly rake the material into the soil, being careful not to damage the roots, and then generously water. A garden rake or hand cultivator work well. Most roses do not need any more than two feedings in early spring and late summer to encourage blooms and right after pruning. Check our gardening calendar for more information.

Diseases to Watch For

Rose leaves with black spot fungus

Rose leaves with black spot.

One of the more common rose diseases is Blackspot. This fungus happens during warm, wet weather. Black spots appear on the foliage, followed by yellowing and leaf drop. Plenty of sun, good air movement, and healthy soil increase plant resistance.

You will need to clean up the dropped leaves and put into trash, not the compost bin. Afterwards, you can add a small amount of compost and then mulch as this will act as a barrier between the plant and any spores in the soil. The Texas Plant Disease Diagnostic Lab has suggestions for how to treat blackspot. They recommend fungicides containing cyproconazole, triforine, or chlorothalonil among others provide good control.  Additionally, there are some organic fungicides that can provide decent control of this disease such as products containing neem oil or potassium bicarbonate. Read the label and follow instructions on how to apply.

Powdery mildew appears on leaves as blistered or curled, with a haze of powdery white fungus and occurs when we have cool, dry overcast conditions while the roses are in their active growth state. Basic treatment is the same as above.

Climbing Roses

Peggy Martin Rose in full bloom will help fuel your love of roses

The climbing rose, ‘Peggy Martin’  in the Earth-Kind Demonstration Garden at the AgriLife Extension office on Smith Road.

If you are growing a climbing rose (and I hope you do so), in order for the rose to produce more blooms, create arches with the long canes, wrapping or braiding around a post or even mild twists as this promotes leafy growth and flowers all along the cane. This allows unlimited creativity in using climbing roses as decorations for your garden.

If you need to tie your rose canes, be sure to use a soft tie material to gently fasten such as a roll of jute twine.

Two Bloom Seasons in Central Texas

Remember here in Central Texas we have two intense bloom seasons, spring and fall, and in between we have two more or less dormant seasons of summer and winter. Winter dormancy consists of shedding foliage, stopping blooms and storing the plant’s energy in the soil-protected roots. Summer dormancy often means shedding some foliage as well as it becomes heat stressed. In order to help the rose in either dormancy to be less stressed, remember watering well at the base, and mulching to protect the soil’s moisture which also acts as a barrier of insulation. And, as a bonus, the mulch slowly breaks down and becomes even more compost for the coming season. A win – win combination for your rose!

What’s Not to Love?

There are numerous beautiful roses available at many Austin nurseries or places online like the Antique Rose Emporium. Check them out, learn about the many lovely Earth-Kind/antique roses and, if you have never grown them or previously had poor luck with roses, give them a new try. What’s NOT to love about something that has given gardeners beauty, fragrance, and grace for centuries!

Additional Resources

Best Roses for Austin and Travis County

Black Spot of Roses

How to take a soil test

Earth-Kind® Roses

Old Roses by Dr. William Welch

The Organic Rose Garden by Liz Druitt, Taylor Trade Publishing (April 1, 1996)

Good Bugs for Your Garden by Allison Starcher, Algonquin Books (January 5, 1995)

Plant Problems and Maintenance

Heirloom Gardening in the South by William C. Welch and Greg Grant

March Gardening Checklist for Austin and Central Texas

Carolyn Williams blog author

Carolyn Williams and her husband live and garden west of Austin in the land of limestone and caliche. This will be her 21st year as a member of Travis County Master Gardeners Association, where she has held several offices including two years as President. Carolyn has chaired numerous committees , writes articles for the TCMGA Compost Bin, gives talks to local clubs and organizations, and is a certified Landscape Designer who always enjoys discovering the beauty and rhythms of her own garden.