Take Herbaceous Plant Cuttings Now
October is a great time to take plant cuttings of your favorite perennials to propagate in your greenhouse or home over the winter. Propagating your own plants now helps to preserve plants that might be lost in the upcoming freezes and is a source of free plants for spring planting.
Eight Steps for Successful Plant Propagation
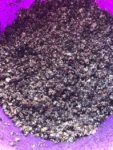
Coir and vermiculite are used in this propagation medium
Propagation Medium
The first thing you need is the right medium to root your cuttings in. Aeration, drainage and ability to hold moisture are all important characteristics to consider. Do NOT use potting soil. The role of the medium is to support the plant while it’s developing roots – not to actually grow the top of the plant. For this reason, coir, perlite, vermiculite, or even sand are the right materials to use. Whatever you choose, make sure it’s been sterilized to inhibit fungal disease.
Moisture
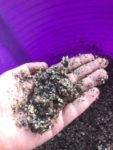
Moist medium should clump together loosely
Proper moisture is key to getting the roots to grow from the stem cutting. Make sure to moisten the propagation mix before you use it. Be careful not to breathe any dust from your dry ingredients while you’re mixing and moistening the medium. Wear a dust mask if you have one.
Sometimes the medium (especially coir) is so dry that it may have to sit for an hour or more to absorb the water. Test the moisture level by squeezing a handful of medium in your hand. It should form a loose clump.
Take the Cuttings
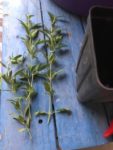
Choose healthy stems that haven’t bloomed.
For best results on herbaceous plants, choose stems that haven’t flowered and are still flexible when bent. There are two types of cuttings: tip cuttings and section cuttings.
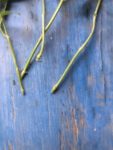
Remove lower leaves and the excess stem below a node.
For a tip cutting, select a stem with healthy leaves at the tip. Remove the lower foliage and leave the stem with one or two bare nodes.
For stem cuttings, take two- to three-inch sections of stem that include nodes, keeping track of which end is up. Carefully remove the lower foliage to leave a section of bare stem to insert into the propagation medium.
For both methods, cut off excess stem at the lowest node. Removing this extra piece of stem helps prevent rot. I like to have at least two nodes from which roots can grow.
Rooting Hormone?
Rooting powders or gels that provide supplemental auxin (a naturally occurring hormone responsible for root development) can be used but may not be necessary. To use hormones, dip the basal end of the cutting into the hormone before sticking it in the propagation medium.
Place Cuttings into Medium
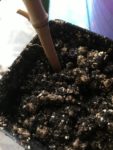
Here a piece of bamboo is used to create a hole in the medium.
Use a pencil or some other tool to make a hole in the rooting media. This is especially important if you’ve dipped the cutting in rooting hormone because you don’t want to strip off the substance as you insert the cutting. Gently firm the soil around the cutting with your finger or the tool.
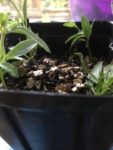
This 4-inch pot has a cutting positioned above each drainage hole.
I usually place more than one cutting in the tray or pot. In a four-inch pot I’ll have three or more cuttings placed around the edge. I’ve found that placing them right next to the edge above a drainage hole helps me to see when the cuttings are properly rooted.
Don’t forget your plant tags! Write the name of the plant and the date you took the cutting. These kind of records help you learn best practices for your unique set of plants and propagation methods.
Humidity
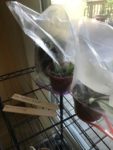
Use old plastic bags or bottles to maintain humidity, place in diffused light.
Your cuttings don’t have roots, which means they have no way to replace water lost through transpiration. Transpiration is the process in which plants release the water vapor through the leaves.
To increase humidity for the cuttings, I like to use old plastic storage bags, but you can use plastic wrap or even tops or bottoms of clear plastic bottles. You still need ventilation to avoid disease, so don’t seal the bag. If using a plastic bottle, take off the screw top.
Light
Light can be a factor in the speed of root development. Low light levels can slow the progress of root formation. Conversely, very intense light can place too much stress on the cuttings. It’s best to find an indirect, diffused source of light. I use an east-facing sliding glass door that doesn’t get direct sunlight for my propagation area.
Temperature
For best results, maintain daytime temperatures at 70 degrees F. If you can’t, use a heat mat that will provide rootzone temperatures between 70-75 degrees F. Some people have heated propagating benches in their greenhouses for this very purpose.
How Long Does it Take?
Not all plants form roots at the same rate. It can take a few weeks to a month before new roots appear at the leaf nodes. Keep your cuttings watered during this time so that the medium stays moist. You should let them get a nice mat of roots before potting them into growing mix. I usually wait until I can see roots growing through the bottom of the tray or pot (which is why I position them above the drainage holes.) You can use a popsicle stick or butter knife to gently lift the cuttings out of the pot to check for roots after ten days or so. Don’t get discouraged unless the stem starts to rot.
Cheap Plants!
Learning how to propagate your own plants is fun and a great way to increase your plant collection without spending a lot of money. You’re also cultivating particular types or varieties that survive in your unique gardening situation. This increases your chance for success and makes your thumb even greener. Be careful though, it’s addictive. Be sure to find neighbors or friends that will take your excess inventory – or just become a plant hoarder like me.
Additional Resources
Plant Propagation information hub.
Principles of Propagation by Cuttings from Dr. Fred Davies, Department of Horticultural Sciences, Texas A&M University
For a list of plants and their preferred propagation method see Propagation of Selected Annuals and Herbaceous Perennials Used As Ornamentals from Hartmann, Hudson T, Kester, Dale E, Davies, Fred T., Geneve, Robert L.; Hartmann and Kester’s Plant Propagation Principles and Practices; 8th Edition; Prentice Hall 2011
Biology of Plant Propagation from Hartmann, Hudson T, Kester, Dale E, Davies, Fred T., Geneve, Robert L.; Hartmann and Kester’s Plant Propagation Principles and Practices; 8th Edition; Prentice Hall 2011
Research Publication Hub for Dr. Fred Davies, Department of Horticultural Sciences, Texas A&M University
How to Pasteurize Medium and Sterilize Containers and Tools
About Sheryl Williams
 Sheryl Williams has been a Travis County Master Gardener since 2010 and currently works as the Horticulture Program Assistant at Texas A&M AgriLife Extension – Travis County. She was introduced to gardening by her mom and grandma and has been an avid vegetable gardener most of her life. Sheryl believes that there is nothing more satisfying than growing and preparing your own food. She likes gardening in Austin year round and concedes that means pulling weeds every day. She practices organic gardening principles and enjoys the challenge of outsmarting garden pests. Occasionally she loses these battles, but doesn’t mind sharing a good meal.

